

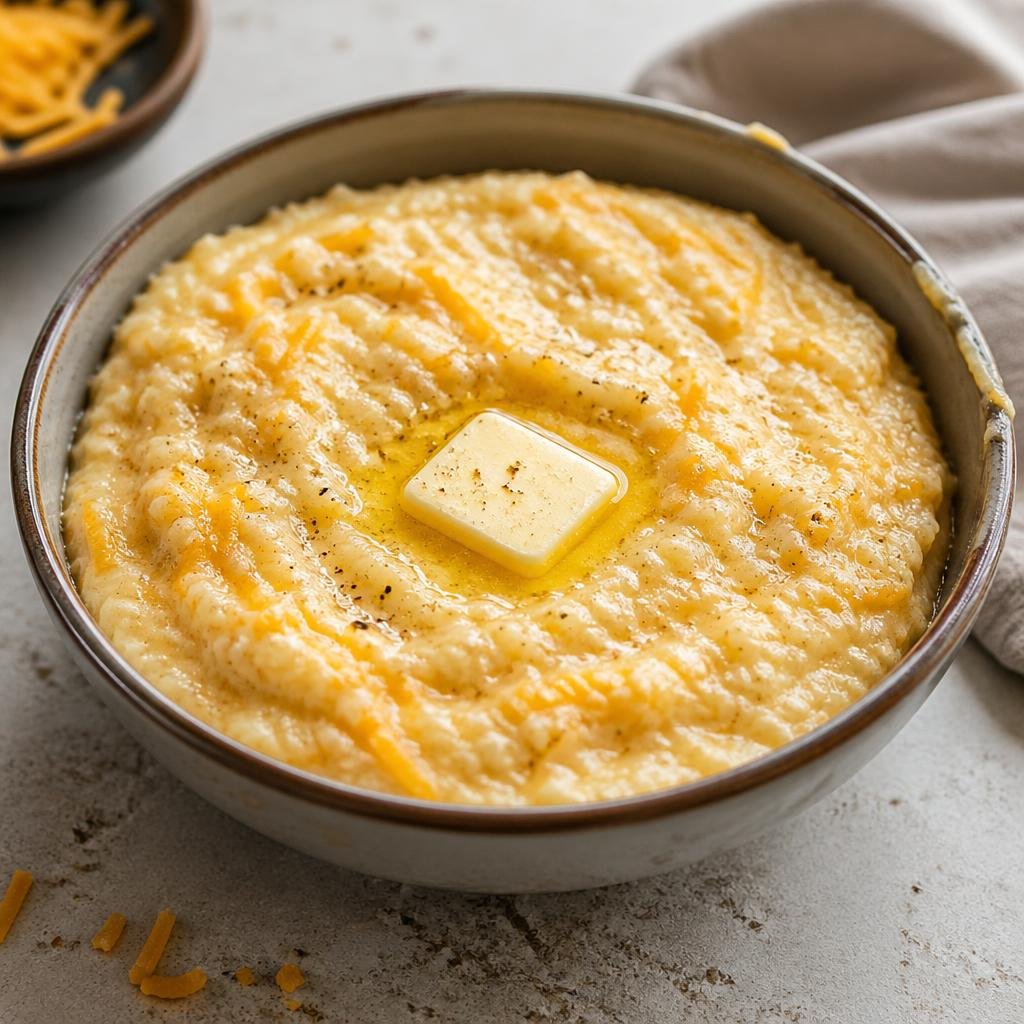
There are side dishes that quietly fill a plate, and then there are side dishes that people ask about before they have even finished eating. Paula Deen Garlic Cheese Grits belong firmly in the second group. They are creamy, cheesy, buttery and full of mellow garlic flavour, and they turn an ordinary Southern staple into something worth planning a meal around. The whole recipe takes just 30 minutes from start to finish, it serves 6 people, and it uses only 9 ingredients, most of which are probably already in your kitchen.
Garlic cheese grits are one of those dishes that sound simple and taste far better than they sound. Quick-cooking grits simmer in salted water or chicken broth until thick and smooth, then butter and sharp cheddar melt in until the mixture turns golden, and a whisked mixture of eggs, milk, garlic and black pepper gives it richness and body. The result is a side dish that works just as well at a Thanksgiving table as it does next to fried chicken on a weeknight, and it is exactly the kind of warm, comforting food people reach for again and again in the holiday season. This guide walks you through the full recipe exactly as it appears on Recipes Walay, with every ingredient, every step, expert tips, variations, serving ideas, storage guidance and answers to the questions people actually ask before they make it.
The full recipe is on Recipes Walay at https://recipeswalay.com/paula-deen-garlic-cheese-grits-recipe/
Why You Will Love Paula Deen Garlic Cheese Grits
Some recipes earn their place on the table through speed, and some through flavour. This one manages both, which is why it is such a useful dish to have in your collection. It takes 30 minutes in total, with only 10 minutes of prep and 20 minutes of cooking, and it feeds 6 people generously, so it is easy to fit into a busy holiday schedule or a relaxed family dinner.
First, the flavour is rich without being complicated. Sharp cheddar gives the grits a deep, tangy character, a full stick of butter makes them silky and golden, and two cloves of minced garlic add a mellow, savoury note that runs all the way through the dish. Nothing here is fussy or hard to find, and the combination is the classic Paula Deen approach: good ingredients, cooked with patience, and not rushed.
Second, the texture is the whole point of grits done well, and this recipe is built to get it right. The grits are whisked slowly into boiling liquid so they never clump, they simmer gently until thick and creamy, and the cheese and butter are stirred in off the heat so they melt smoothly instead of turning grainy. The eggs and milk, whisked together first and poured in slowly while you stir, give the finished dish a soft, almost custard-like richness that sets it apart from plain boiled grits.
Third, it is endlessly versatile. These grits work as a Thanksgiving side dish next to roast turkey, as a breakfast side with over-easy eggs and thick-cut bacon, as a base for shrimp and grits, or as a comforting bowl next to fried chicken or barbecue ribs. They are also easy to dress up or down: keep them plain for a simple family supper, or finish them with crispy bacon bits and chopped green onions when you want something a little more special.
What Are Garlic Cheese Grits?
Garlic cheese grits are a Southern American side dish made from ground corn, cooked slowly in liquid until soft and creamy, then enriched with butter, cheese and garlic. Grits themselves are made from dried corn that has been ground into a coarse meal, and when they are simmered gently they absorb the liquid and turn into a smooth, spoonable porridge with a mild, comforting corn flavour. They are a staple of Southern cooking, served at breakfast, lunch and dinner, and they have been a part of family tables in the American South for generations.
Paula Deen’s version follows the classic pattern and adds her signature generosity with butter and cheese. Quick-cooking grits are the base here, not instant grits, and that choice matters: quick-cooking grits give the best balance of speed and creaminess, while instant grits lack the texture and flavour that make the dish worth making. The grits cook in water or chicken broth, and the broth option is worth considering, because it adds a much deeper savoury flavour to the finished dish. Once the grits are thick and smooth, butter and shredded sharp cheddar are stirred in off the heat until they melt completely, and then a mixture of beaten eggs, milk, garlic and black pepper is poured in slowly while stirring. The eggs cook gently in the warmth of the grits and give the dish its soft, rich body, and the finished grits can either be served straight from the pot or poured into a greased baking dish and baked at 350 degrees Fahrenheit for 30 minutes for a firmer, sliceable texture.
It is worth saying plainly that grits are not porridge made from oats and they are not polenta, although all three are cooked grains served warm. Grits are corn, and their flavour is mild and slightly sweet, which is exactly why they take so well to butter, cheese and garlic. They are also naturally gluten-free, because corn grits contain no wheat, although you should always check the packaging to make sure your grits were not processed in a facility that also handles wheat.
Ingredients You Need for Paula Deen Garlic Cheese Grits (with Quantities)
One of the best things about this recipe is how short the shopping list is. Nine ingredients, all easy to find, and every one of them earns its place. Here is the full list, with the exact quantities from the recipe on Recipes Walay:
- 1 cup quick-cooking grits (not instant)
- 4 cups water (or chicken broth for more flavour)
- 1/2 teaspoon salt
- 1/2 cup unsalted butter (one full stick)
- 2 cups sharp cheddar cheese, shredded
- 2 large eggs, beaten
- 1/2 cup whole milk
- 2 cloves garlic, minced
- 1/2 teaspoon black pepper
A few notes on the ingredients will help you get the best result. First, use quick-cooking grits, not instant grits. Instant grits cook faster but they lack the texture and flavour of quick-cooking or stone-ground grits, and the difference shows in the finished dish. Quick-cooking grits give you the best balance of speed and creaminess, and they are the ones this recipe was written for.
Second, grate your own cheese if you can. Pre-shredded cheese is coated in a waxy substance that stops it clumping in the bag, and that coating can make melted cheese slightly grainy. Grating a block of sharp cheddar yourself takes only a minute and makes the grits noticeably creamier. Sharp cheddar is the traditional choice here, because its deep, tangy flavour stands up to the butter and the corn, but the recipe also works with smoked Gouda or pepper Jack if you want a different flavour profile. Whatever you choose, make sure it is a good melting cheese.
Third, use whole milk rather than skimmed milk. The fat in whole milk helps the eggs and the cheese blend into a smooth, rich mixture, and it is part of what gives the finished grits their soft, luxurious texture. If you want an even more decadent result, you can use half-and-half instead of milk. And use unsalted butter, so that you control the salt: the recipe already includes half a teaspoon of salt in the cooking water, and unsalted butter keeps the seasoning exactly where the recipe intends it.
Finally, use fresh garlic, minced finely. Two cloves is the right amount for a mellow garlic flavour that runs through the dish without overpowering it. Garlic added at the right time, whisked into the egg and milk mixture, gives a gentle savoury taste throughout, rather than the sharp bite that raw garlic can have.
Equipment You Need
You do not need any special equipment for this recipe, and that is part of its charm. Everything on this list is standard kitchen equipment:
- Large heavy-bottomed saucepan
- Whisk
- Wooden spoon
- Measuring cups and spoons
- Cheese grater
- Baking dish (optional, for the baked version)
The heavy-bottomed saucepan matters more than it might seem. Grits thicken as they cook and they can catch and stick on the bottom of a thin pan, so a heavy base spreads the heat evenly and gives you a much better chance of a smooth, lump-free result. The whisk is essential at the start, when the grits first go into the boiling water, because constant whisking in the first two minutes is what stops lumps forming. The wooden spoon is useful later, when the grits are thick and the whisk would drag, and the cheese grater is there so you can grate your own cheddar. The baking dish is only needed if you choose the baked version, where the grits go into a greased dish and bake at 350 degrees Fahrenheit for 30 minutes for a firmer texture.
How to Make Paula Deen Garlic Cheese Grits Step by Step
The recipe card gives a total time of 30 minutes: 10 minutes of prep and 20 minutes of cooking. The steps below follow the recipe on Recipes Walay exactly, broken into twelve clear stages so you can follow them one at a time without losing your place.
1. Bring the Water or Broth to a Rolling Boil
Put 4 cups of water, or chicken broth if you prefer the deeper flavour, into a large heavy-bottomed saucepan and bring it to a rolling boil over a medium-high heat. Using broth instead of water is one of the easiest upgrades in this recipe, because the grits absorb the liquid as they cook, and broth gives them a much richer savoury base than plain water. Either way, wait for a proper rolling boil before you go any further, because the grits need that heat to start cooking evenly the moment they hit the liquid.
2. Add the Salt to the Water First
Add half a teaspoon of salt to the boiling water before the grits go in. This matters more than it sounds, because it means the grits are seasoned from the very beginning of the cooking process, all the way through, rather than only on the surface at the end. Stir the salt in and let the water come back to the boil.
3. Whisk the Grits into the Boiling Water Slowly
Now add 1 cup of quick-cooking grits, and this is the step that decides whether your grits are smooth or lumpy. Pour the grits in very slowly, in a thin steady stream, while whisking constantly. Do not dump them in all at once. Constant stirring during the first two minutes of cooking prevents clumps from forming, and it is the single most important technique in the whole recipe. Keep whisking until all the grits are in and the mixture is smooth.
4. Reduce the Heat to Low and Cover the Pot
As soon as the grits are in, reduce the heat to low immediately and cover the pot. The grits should simmer gently, not boil hard. A fierce boil will make them spit and stick, while a gentle simmer lets them cook evenly and absorb the liquid at their own pace. Put the lid on and let them settle into that slow, steady simmer.
5. Stir Occasionally So the Grits Do Not Stick
While the grits simmer, stir them occasionally with a wooden spoon so they do not stick to the bottom of the pan. Grits thicken as they cook and the bottom of the pot is where they are most likely to catch, especially in the last few minutes. A quick stir every minute or so is enough, and it also lets you check the texture as it develops. If the grits look too dry at any point, add a splash more water and stir it in.
6. Cook Until the Grits Are Thick and Creamy
Continue cooking the grits for about 5 to 7 minutes, until they are thick and creamy. The texture you are looking for is soft and smooth, thick enough to hold its shape on a spoon but still loose enough to pour. If they look too dry, add a splash more water. If they seem too thin, give them another minute or two on the heat. Trust your eyes and your spoon here: when the grits look thick, creamy and smooth, they are ready for the next stage.
7. Remove the Pot from the Heat
Take the pot off the heat before you add the butter and cheese. This is a deliberate step, not a pause. Adding cheese over direct heat can make it separate and turn grainy, while adding it off the heat lets it melt gently in the warmth of the grits and stay smooth. Set the pot on a heatproof surface and have your butter and shredded cheddar ready to go.
8. Stir in the Butter Until It Melts
Add half a cup of unsalted butter, one full stick, to the hot grits and stir until it has melted completely and is well combined. The mixture should look golden and smell delicious and garlicky at this stage, and the butter gives the grits their first layer of richness. Stir with the wooden spoon until you can no longer see separate streaks of butter, and the whole pot looks evenly glossy.
9. Stir in the Shredded Cheddar Until Melted
Now add 2 cups of shredded sharp cheddar cheese and stir until it has melted completely and is well combined with the grits. Work steadily and keep stirring until the cheese has disappeared into the mixture and the grits look golden, smooth and evenly cheesy. This is where grating your own cheese pays off, because freshly grated cheddar melts more smoothly than pre-shredded cheese, and the finished grits will be creamier for it.
10. Whisk the Eggs and Milk Together in a Separate Bowl
In a separate small bowl, whisk 2 large beaten eggs and half a cup of whole milk together until they are fully combined. Doing this in a separate bowl, rather than cracking the eggs straight into the pot, means the eggs are evenly mixed with the milk before they meet the hot grits, and that even mixture is what gives the finished dish its soft, rich body instead of streaks of cooked egg.
11. Add the Garlic and Black Pepper to the Egg Mixture
Add 2 cloves of minced garlic and half a teaspoon of black pepper to the whisked egg and milk mixture, and stir them in. Adding the garlic here, rather than into the boiling water at the start, is deliberate: it means the garlic cooks gently in the warmth of the grits and gives a mellow, savoury taste throughout, instead of a sharp or bitter edge. The black pepper goes in at the same stage, so the seasoning is evenly spread through the dish.
12. Pour the Egg Mixture into the Warm Grits and Finish
Slowly pour the egg and milk mixture into the warm grits while stirring constantly, and keep stirring so the eggs blend in smoothly. Then return the pot to a low heat for a few minutes to cook the eggs through, stirring all the time. Alternatively, pour the mixture into a greased baking dish and bake it at 350 degrees Fahrenheit for 30 minutes, which gives a firmer texture that you can slice or spoon out in neat portions. Either way, serve the grits warm, straight away, while they are at their creamiest.
Expert Tips for Perfect Garlic Cheese Grits
The recipe itself is simple, but a few habits make the difference between good grits and great grits. These tips come directly from the recipe on Recipes Walay, and they are worth reading before you start cooking, not after.
Use broth instead of water. Replacing the water with chicken or vegetable broth gives the grits a much deeper savoury flavour, and it costs nothing extra. This is the easiest single change you can make, and it is the one that people notice most when they taste the finished dish.
Grate your own cheese. Pre-shredded cheese has a waxy coating that stops it clumping in the bag, and that coating can make melted cheese slightly grainy. Grating your own sharp cheddar makes the grits much creamier, and it only takes a minute with a box grater.
Never rush the cooking process. Grits need time to absorb the liquid and turn creamy, and if you rush them they can stay crunchy in the middle. Keep the heat low, stir occasionally, and give them the full 5 to 7 minutes of gentle simmering. Patience is the secret ingredient here, and it shows in the texture.
Whisk constantly at the start. The first two minutes decide whether your grits are smooth or lumpy. Pour the grits in slowly, in a thin stream, and whisk without stopping until they are all in and the mixture is smooth. Once they are in and cooking, you can relax and stir only occasionally.
Add the garlic at the right time. Garlic whisked into the egg and milk mixture cooks gently in the warmth of the grits and gives a mellow, savoury taste throughout. Garlic thrown into boiling water at the start can turn harsh, and garlic added at the very end can taste raw. The middle of the process is the right place for it.
Variations to Try
Once you have made the classic version, this recipe is easy to adapt, and the variations below all stay true to the ingredients and method of the original. They are drawn from the tips on Recipes Walay, plus simple swaps that fit the same cooking process.
Add some spice. Stir in some chopped jalapeños or a dash of hot sauce for a spicy kick. The heat works beautifully against the rich cheese and butter, and a small amount goes a long way, so start with a little and add more to taste. This version is especially good next to barbecue or fried chicken.
Make it cheesier in a different direction. Sharp cheddar is the traditional choice, but you can use smoked Gouda or pepper Jack for a different flavour profile. Smoked Gouda gives a deep, smoky note, while pepper Jack adds gentle heat. Just make sure whatever you choose is a good melting cheese, because a cheese that does not melt smoothly will make the grits grainy.
Make it creamier. Use half-and-half instead of milk if you want an extra decadent Southern experience. The extra fat makes the finished grits even silkier, and it is a good choice when the grits are the star of the meal rather than a supporting side.
Make it a baked casserole. Pour the finished mixture into a greased baking dish and bake it at 350 degrees Fahrenheit for 30 minutes. The top turns lightly golden and the inside sets into a firmer texture that you can slice or scoop in neat portions, which makes it easier to serve at a buffet or a holiday table.
Top it like a loaded side. Top the finished grits with crispy bacon bits or chopped green onions before serving to add some crunch and a fresh, savoury finish. This is a simple way to make the same dish feel special for guests, and it takes only a minute.
Use broth and add vegetables. Cook the grits in chicken or vegetable broth, and serve them with sautéed spinach or kale on the side to add some freshness to the meal. The creamy texture of the grits balances out salty meats very well, and the greens cut through the richness nicely.
What to Serve with Garlic Cheese Grits
Garlic cheese grits are endlessly versatile, and the recipe on Recipes Walay suggests several pairings that show just how many kinds of meals they fit into. The creamy texture balances out salty meats very well, so they work with almost any rich, savoury main course.
For a classic Southern plate, serve them with fried shrimp for a proper shrimp and grits meal, or next to crispy fried chicken or barbecue ribs, where the soft, cheesy grits soak up the juices and balance the salt and smoke of the meat. For breakfast, try them with over-easy eggs and thick-cut bacon, which is one of the most satisfying combinations in Southern cooking. For something lighter, serve them with sautéed spinach or kale, which adds freshness and a little bitterness to cut through the richness.
At a Thanksgiving table, these grits sit happily next to the rest of the holiday spread. They pair beautifully with roast turkey, and if you are building the full menu, they work alongside mashed potatoes, sweet potato pie and green bean casserole without repeating any flavours. Good companions from Recipes Walay include Paula Deen’s green bean casserole at https://recipeswalay.com/easy-paula-deen-green-bean-casserole-for-thanksgiving/, classic mashed potatoes at https://recipeswalay.com/easy-mashed-potatoes-for-thanksgiving/, scalloped potatoes at https://recipeswalay.com/easy-scalloped-potatoes-for-thanksgiving/, and Grandma’s Thanksgiving stuffing at https://recipeswalay.com/easy-grandmas-thanksgiving-stuffing-for-the-holiday-table/. For the main course, Martha Stewart’s roast turkey at https://recipeswalay.com/easy-martha-stewart-roast-turkey-for-thanksgiving/ and Thanksgiving prime rib at https://recipeswalay.com/easy-thanksgiving-prime-rib-for-the-holidays/ both work well, and Paula Deen’s baked brie at https://recipeswalay.com/easy-paula-deen-baked-brie-for-thanksgiving/ makes a lovely starter before the grits arrive. Crack green beans at https://recipeswalay.com/easy-crack-green-beans-for-thanksgiving/ add a fresh, savoury contrast, and sweet potato pie at https://recipeswalay.com/easy-sweet-potato-pie-for-thanksgiving/ finishes the meal on a sweet note.
Make-Ahead and Storage
One of the practical strengths of this dish is that it stores and reheats well, as long as you know how grits behave once they cool. The recipe on Recipes Walay gives clear guidance, and it is worth following exactly.
Store leftovers in the fridge in an airtight container for up to 3 to 4 days. Grits thicken as they cool, and that is normal, not a sign that anything has gone wrong. When you reheat them, add a splash of milk or water before microwaving, and stir them well, which brings back much of the original creamy consistency. On the stovetop, reheat them on a low heat while stirring, adding a little liquid as needed until they are smooth again.
Freezing is not recommended for this recipe. The recipe is clear on this point: freezing cooked grits is not a good idea, because the texture can become grainy once thawed, and the smooth, creamy quality that makes the dish special is lost. If you need to make the dish ahead, it is better to keep it in the fridge for a few days and reheat it gently than to freeze it.
If you are cooking for a holiday, you can make the grits a day ahead, store them in the fridge, and reheat them on the stovetop with a splash of milk or water while the turkey rests. That takes the pressure off the day itself and still gives you a dish that tastes freshly made.
Nutrition and Calories
The recipe gives a clear nutrition picture, and it is honest about what this dish is: rich, buttery comfort food, best enjoyed as part of a balanced plate rather than on its own. Each serving contains 310 calories, and the recipe card on Recipes Walay lists the full breakdown per serving as follows: total fat 22 grams, cholesterol 95 milligrams, sodium 480 milligrams, carbohydrates 18 grams, and protein 10 grams.
Those numbers make sense when you look at the ingredients. Half a cup of butter and 2 cups of sharp cheddar across 6 servings is generous, and it is the reason the grits taste so good. The eggs and milk add protein, and the grits themselves provide the carbohydrates. If you want a lighter version, you can use half-and-half instead of milk for richness, or you can reduce the butter slightly, but the recipe as written is the classic Paula Deen version, and it is meant to be enjoyed as a treat, especially at a holiday meal where the rest of the plate can carry the lighter dishes.
The recipe is naturally gluten-free, because corn grits contain no wheat. That makes it a useful side dish for guests who avoid gluten, as long as you check the packaging of your grits to make sure they were not processed in a facility that also handles wheat.
Occasions to Serve Garlic Cheese Grits
This is a dish that fits more occasions than most side dishes, and the recipe on Recipes Walay lists several that show its range. For a holiday brunch, these grits are a huge hit at Easter or Christmas morning gatherings, where they sit well next to eggs, bacon and baked goods. For game day, serve them in small bowls as a warm, comforting snack during football season, topped with bacon bits or green onions. For potlucks, the recipe is easy to double and always disappears quickly at church socials and community gatherings, because it travels well and reheats easily. For dinner parties, use the grits as a sophisticated base for seared scallops or grilled steak tips, which turns a humble Southern staple into something that feels genuinely elegant.
And of course, for Thanksgiving, they are a natural fit. Thanksgiving is ten days away as this guide is published, and the holiday table is exactly where a warm, cheesy, make-ahead side dish earns its place. The grits can be made ahead, reheated gently, and served alongside the turkey and the rest of the spread, and they give guests who might not love every dish on the table something rich and comforting to enjoy.
FAQs about Paula Deen Garlic Cheese Grits
1. Can I use instant grits for this recipe?
It is best to avoid instant grits for this recipe. They lack the texture and flavour of quick-cooking or stone-ground grits, and the difference shows in the finished dish. Quick-cooking grits give the best balance of speed and creaminess, and they are the ones the recipe was written for. If you only have instant grits, the dish will still cook, but it will not have the same smooth, rich texture.
2. What is the best cheese to use for garlic cheese grits?
Sharp cheddar is the traditional choice for this recipe, because its deep, tangy flavour stands up to the butter and the corn. However, you can use smoked Gouda or pepper Jack for a different flavour profile. Smoked Gouda gives a deep, smoky note, and pepper Jack adds gentle heat. Just make sure whatever you choose is a good melting cheese, because a cheese that does not melt smoothly will make the grits grainy. Grating your own cheese, rather than using pre-shredded cheese, also makes the grits much creamier.
3. How do I prevent my grits from being lumpy?
The trick is to whisk the grits into the boiling water very slowly, in a thin steady stream, while whisking constantly. Do not dump them in all at once. Constant stirring during the first two minutes of cooking prevents clumps from forming, and it is the single most important technique in the recipe. Using a heavy-bottomed saucepan and stirring occasionally while the grits simmer also helps, because it stops them catching and clumping on the bottom of the pot.
4. Is this recipe gluten-free?
Yes, corn grits are naturally gluten-free. However, always check the packaging of your grits to ensure they were not processed in a facility that also handles wheat. That check matters for anyone with coeliac disease or a serious gluten sensitivity, even though the grits themselves contain no gluten.
5. Can I make garlic cheese grits ahead of time?
Yes. Store the cooked grits in the fridge in an airtight container for up to 3 to 4 days. Grits thicken as they cool, so when you reheat them, add a splash of milk or water before microwaving, or reheat them on the stovetop on a low heat while stirring, until they are smooth and creamy again. Freezing is not recommended, because the texture can become grainy once thawed. For a holiday meal, making the grits a day ahead and reheating them gently is a practical way to take pressure off the day itself.
6. What should I serve with garlic cheese grits?
These grits are endlessly versatile. Serve them with fried shrimp for a classic shrimp and grits meal, next to crispy fried chicken or barbecue ribs, or for breakfast with over-easy eggs and thick-cut bacon. They also work with sautéed spinach or kale for a fresher plate, and as a base for seared scallops or grilled steak tips at a dinner party. At Thanksgiving, they sit well next to roast turkey, mashed potatoes, stuffing and green bean casserole.
Final Thoughts
Paula Deen Garlic Cheese Grits are a true Southern treasure, and this guide has walked through the full recipe exactly as it appears on Recipes Walay: 9 ingredients, 10 minutes of prep, 20 minutes of cooking, 30 minutes in total, and 6 generous servings of creamy, cheesy, garlicky comfort. The technique is simple, the ingredients are easy to find, and the result is a side dish that works at a Thanksgiving table, a holiday brunch, a game day gathering, or an ordinary weeknight dinner.
The habits that make it work are worth remembering: whisk the grits in slowly, keep the heat low, grate your own cheese, add the butter and cheese off the heat, and let the garlic cook gently in the warmth of the dish. Get those right, and you will have grits that are smooth, golden and full of flavour, every single time. Whether it is for a fancy brunch or a simple dinner, these grits never disappoint, and your family will love this creamy, cheesy dish as much as the recipe promises. Happy cooking!